A few days ago, I was in an unfamiliar grocery store, in Canada, looking for peanut butter to combine, in some half-conceived way, with chocolate. I was intrigued by a jar of almond butter. My plans became even more vague, and the almond butter went into the cart.
Later, I resolved to make almond butter and chocolate cookies. The simplest variations seem to be these two, which are without and with oatmeal, respectively; neither contains wheat flour. I don’t know if this is because they’re best this way, or because they’re good enough like that and fit in the gluten-free niche. My searches for almond butter recipes threw up mostly recipes with labels like “vegan” and “gluten-free.” I’m neither vegetarian nor gluten-intolerant, but I’m all for cutting out the middleman between me and my most flavourful calories, so I suspended my misgivings.
I went for the simplest recipe, without oats – simplest, that is, once I’d looked up what “Sucanat” was (turns out it’s a brand name for evaporated sugar cane juice) and determined that I could swap in an equivalent amount of brown sugar.

I had bought baker’s chocolate, in individually-wrapped one-ounce squares, but now I wanted chips. The baby was sleeping, so I decided to smash the chocolate outside on the brick patio. I wrapped my chocolate squares in some paper towels and brought them, and a meat tenderizer, outside. Then I noticed it was raining pretty hard, so I went back in and put on some shoes. I bashed away (quickly, since the paper towels were beginning to soak through), then went inside and carefully unwrapped the chocolate, discarding a few stray spruce needles. Hey, they were only on the outside of the towels, and I’m not cooking for the public here. Maybe the mud helped to replace the minerals I supposedly lost by using refined sugar.
I discovered that, not only was the chocolate not very broken, but the teeth on the tenderizer had driven bits of the paper wrappers into it. I left those in, for their vitamin content. Just kidding, sheesh. You must think I know nothing about food preparation. Where was I? Oh yes. After cutting the first chocolate square up some more with scissors, I retrieved a promotional combination pliers/hammer from Torode Precision Components and pounded at the remaining two squares. This worked very well. I don’t know how I survived up till now without a combination pliers/hammer tool in my kitchen.

Instead of mixing everything else first, like I was supposed to, then adding the chocolate chips, I put the chocolate in the bowl first (since it was ready first). This, and the powdery residue from smashing the chocolate, resulted in some chocolate getting mixed in, and the cookies came out a bit extra-brown. The only problem with this is that it’s a little harder to decide when they look done. It’s not that I don’t read directions, exactly. It’s more that they go in one eye and out the other, which is for some reason a less compelling metaphor than “in one ear and out the other.”

F laughed when he saw me composing this picture. I know my still-life composition skills are not great, but laughable? Cut me some slack, eh? I’m under some time constraints.
If you look closely, there are dents on the side of the meat tenderizer head; evidence of prior tool-misapplication. I don’t remember anything, but my mom has had this thing since I was a kid…
Here’s what I did in the end:
- one cup almond butter
- one egg
- a bit more than 3/4 cup brown sugar
- tiny pinch baking soda (I don’t like the taste)
- even tinier pinch sea or kosher salt (not sure which it was)
- 3 one-ounce pieces of semi-sweet chocolate, smashed
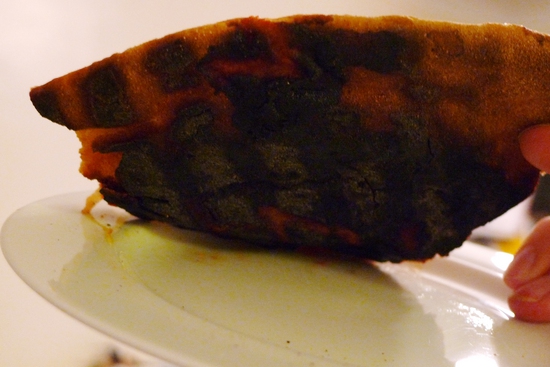
Mix it all together. Roll into balls, place on baking parchment on a cookie sheet, squash with a fork. Bake at 350F (when in Rome, use whatever units the Romans use) for 12-14min (or less; some of mine were a bit dark on the bottom).
I squashed mine partway into baking because I had expected them to flatten by themselves and they didn’t seem to be about to.
I’m thinking of trying a flourless version next time I make peanut butter cookies. Maybe. My mom’s recipe for peanut butter cookies is pretty high-octane as it is.