BBB Retro Sportglasses

Posted on

Back when I rode a bike only occasionally, for fun, I didn’t understand how cyclists wearing lycra, padded gloves, and eye shields could be anything but posers. However, since becoming reliant on cycling to cover distances, I can confirm the utility of all the above-mentioned items.†

Taking things one step further, cycling accessories have become so well integrated into my life that I am working them into a new tradition, which is to to lose them over the summer so that I can buy new ones. My gloves vanished (likely dropped when I stopped to take a photo) several months ago, now, obviously, or it would have been odd weather for winter gloves.

More recently, my MEC Espresso eye shields evaporated one afternoon somewhere between the nursery and the playground. I had been annoyed to lose my winter gloves after only one season of use. I was more annoyed to lose the glasses, because a) I can’t buy them in the UK (shipping from Canada is silly-expensive), and b) I have several spare lenses for that frame. I am even more annoyed now that I look into it, because c) I can’t buy the frame in Canada anymore either, according the MEC website: they’re discontinued.

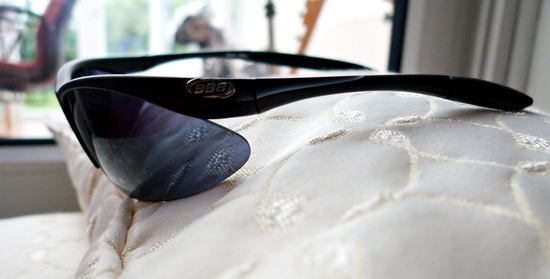
Because I don’t seem to be able to cycle five miles without attacking a flying insect with my eyeball, I quickly ordered some “budget” glasses online: BBB Retro Sportglasses, with clear, yellow, and dark lenses.

It’s hard to buy something online that has to fit in a certain way, and yet I try because I don’t like shopping. I look at what reviews I can find, and take a stab. Here are my observations on these glasses, in case someone else is trying the same thing.

Firstly, I think these are nice-enough looking glasses. They’re not flashy, but they come at a reasonable price, considering they come with three sets of lenses for different light conditions.

Swapping out the two-piece lenses on the fly is a bit of a pain: I found I was prone to dropping at least one piece in my efforts to avoid letting the lens pieces rub against each other. That’s no problem in the winter when all I wear is the clear lens. As I’ve proven already, if the glasses fit, you may almost as well get two pairs for different conditions anyway, and then you’ll have one left when you lose one.

Fit-wise, the lenses angle in significantly, and I find that either my ears are not low enough, my nose is not high enough, or my brow is not prominent enough to keep the bottom edge of the lens from digging into the bottom of my eye socket. The first day I wore these on the ride to work I had the disconcerting experience of glancing in the mirror to discover the sudden appearance of a second set of circles under my eyes!‡ It’s worth noting that I’m not a man, so these glasses were probably not designed with my face type in mind.

The top of the frame is quite curved, again lovely and spacious for a strong forehead but on my face it’s just a silly-looking gap by which bugs and rain access my eyeballs.

All in all, I think these glasses merit the term “good value” if they fit.  I was going to try to make them work for this winter, but I can’t seem to figure out where I put them.

†I still hanker a little after a Poseur jersey, even though some people might take it the wrong way given that my fastest ride has 26″ wheels with 1.5″ slick tires.

‡Perhaps I should say “sudden reappearance,” because in the first year of G’s life I had an actual second bag under each eye.

Making hay

Posted on

I mowed the lawn today, although it seemed more like making hay after all the rain we’ve had. Although looking at the job I did, you might think whoever cut the hay may have had more alcohol than is wise before operating heavy machinery.

Not that it would have been wise to operate small a electric mower while drunk, either. The point is, it took a few passes in some parts of the garden to make it look convincing that I’d done anything more than run a roller over it, and maybe I got a bit less orderly about it after a while.

Someday I will have a gasoline/petrol-powered mower that actually cuts the grass, but I am holding out until I own my own lawn. I am aware that this is a scaled-up version of the resolution I had for one month in 2000, not to buy a coffee maker, and the resolution I held until 2006, not to buy a printer, because we were going to move back to Canada and it would have the wrong plug.

And, I suppose, a scaled-down version of my resolution not to have a baby here in case it ended up with the wrong accent.

Oh well, at least I’m still sticking to one resolution.

BBQ pizza

Posted on

I’m going to share here a recipe for an exquisitely awful meal that we decided to try, earlier this summer, just so you don’t have to. It’s a BBQ pizza. By which I mean cooked on the BBQ grill. Here’s where the disclaimer goes: I don’t take responsibility for anything that might happen if you try to replicate any part of this. You could get hurt; very likely you would waste a perfectly good pizza simultaneously with wasting perfectly good BBQ fuel and needlessly contributing to global warming.

And I wouldn’t recommend eating anything that’s charred black as it’s unlikely to be good for you.

So, to proceed:

Whether we’re barbequeueueiing or baking, we like to start with a basic store-bought pizza and supplement it with extra sauce and toppings. In 100 years, when we retire, we will make our own pizza dough.  Sooner if we ever buy a house with a gigantic kitchen.

As with so many of my recipes, to replicate the results one must employ subtle, carefully-crafted blends of ingredients. In this case, the dregs of a box of pure English wood charcoal play delicately against the robust not-falling-through-the-grill-ness of briquettes from a newly-opened bag of formed BBQ pellets.

Spread the hot coals into an approximately pizza-sized approximate circle.

Gingerly place the pizza directly on the grill, and cover to seal in the heat.

Wait until you begin to smell hot pizza crust. This should take about 45 seconds.

Inspect the underside of the pizza. It should, if you’ve followed the steps precisely, look quite a lot like this. Authentic BBQ!

Now that the bottom is ready, it’s obviously time to start thinking about cooking the top. We decided to insert something between the coals and the bottom of the pizza. We used a double layer of heavy aluminum foil.

No peeking. This is important, not just because opening the lid allows cold air to waft across the part of the pizza that’s not being radiatively heated, but because it allows fresh oxygen to reach the coals, and they’re already too freaking hot.

Here we are! Just 45 minutes after placing it on the grill, the top of the pizza is ready. If you start later than we did, and want to take photos of your creation, you may have to use a flash.

Only eat the top.

The variation I would try if I were to make BBQ Pizza again is to insert the aluminum foil at an earlier stage, but I fixed our oven, so that’s not likely to happen anytime soon.